The Best Food Dehydrators

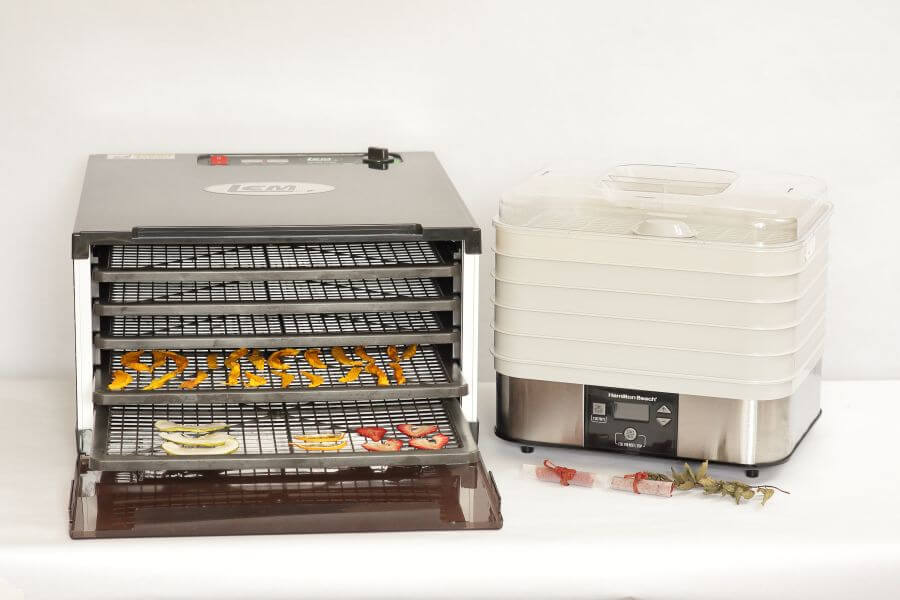
After slicing a small harvest of apples, puréeing seven pints of strawberries and experimenting with a gamut of other dried treats, we’ve determined that the LEM Products – 1152 is the best food dehydrator for home users. It’s versatile, with a design and features that make it easier to operate than the competition. Plus, it dried very consistently in our tests. If you’re only looking for a dehydrator so you can make a bit of fruit leather and small batches of interesting things you find on your raw-food Pinterest board, the Hamilton Beach – 32100A is quite a bit louder than the LEM but takes up less counter space and comes at a fraction of the cost.
After slicing a small harvest of apples, puréeing seven pints of strawberries and experimenting with a gamut of other dried treats, we’ve determined that the LEM Products – 1152 is the best food dehydrator for home users. It’s versatile, with a design and features that make it easier to operate than the competition. Plus, it dried very consistently in our tests. If you’re only looking for a dehydrator so you can make a bit of fruit leather and small batches of interesting things you find on your raw-food Pinterest board, the Hamilton Beach – 32100A is quite a bit louder than the LEM but takes up less counter space and comes at a fraction of the cost.
Table of contents
- Compare the best dehydrators
- 1. Best overall: LEM Products – 1152
- 2. Runner-up: Excalibur – 3500
- 3. Budget pick: Hamilton Beach – 32100A
- The other machines we tested
- How we selected dehydrators to test
- How we tested
- Important features to consider
- A note for raw food drying
- The bottom line
Compare the best dehydrators
| Product | Price | Watts | Drying Area (sq. in.) | Drying Trays |
|---|---|---|---|---|
| 1. LEM - 1152 | $$$ | 500 | 933 | 5 |
| 2. Hamilton Beach - 32100A | $ | 500 | 475 | 5 |
| 3. Excalibur - 3500W | $$$$ | 440 | 949 | 5 |
| 4. Presto - Dehydro 06301 | $$ | 750 | 629 | 6 |
| 5. Nesco - FD-77DT | $$ | 600 | 470 | 4 |
| 6. L'Equip - Filter Pro | $$$ | 530 | 980 | 6 |
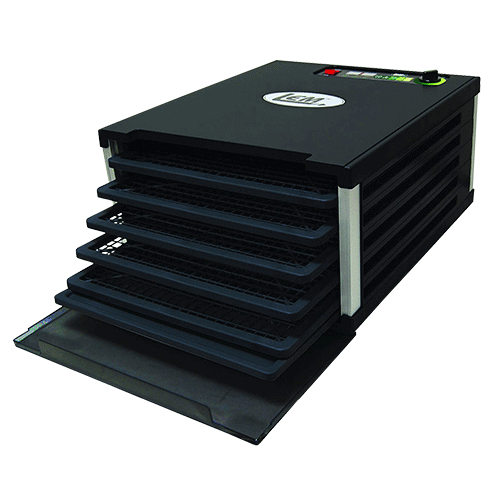
1. Best overall: LEM Products – 1152
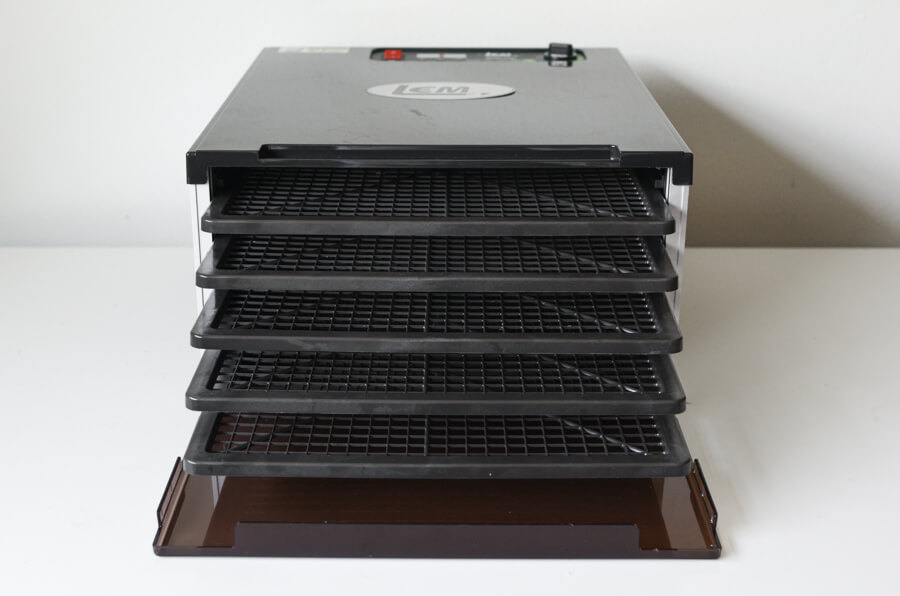
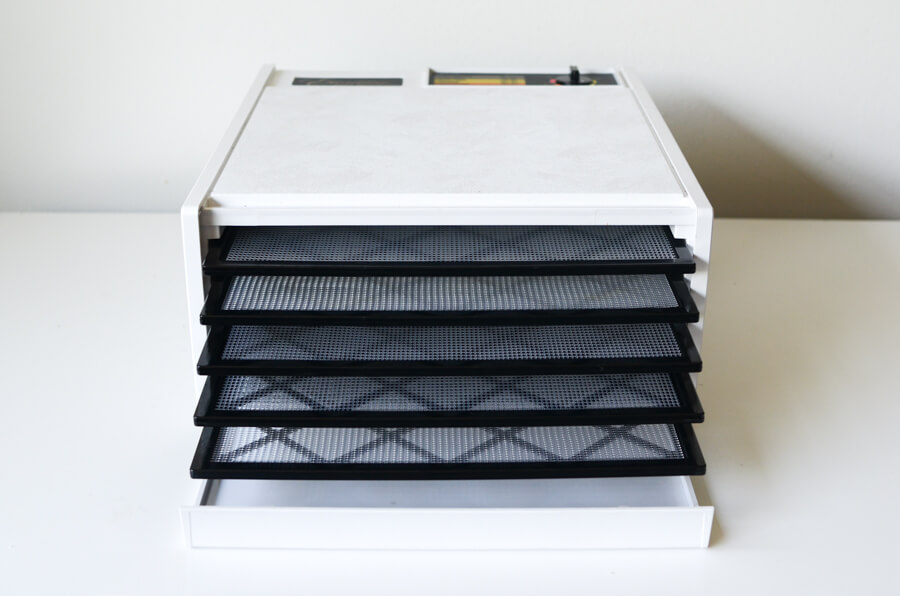
The LEM Products – 1152 checks all the boxes in our testing. The horizontal-flow design with large square trays is easy to work with and helped this machine dry very evenly and quickly.
The five roomy trays use a grid spacing perfect for most home dehydrating applications. If you decide that you want fine mesh to hold seeds or berries, or a solid sheet to make fruit leather, finding or cutting a square piece of material is much easier than trying to make something fit the round machines.

The elephant in the room when we were testing these machines is the forty-year reputation of Excalibur dehydrators as the best of the best; LEM started out making meat-processing equipment for hunters in 1991, and they’re definitely the underdog.
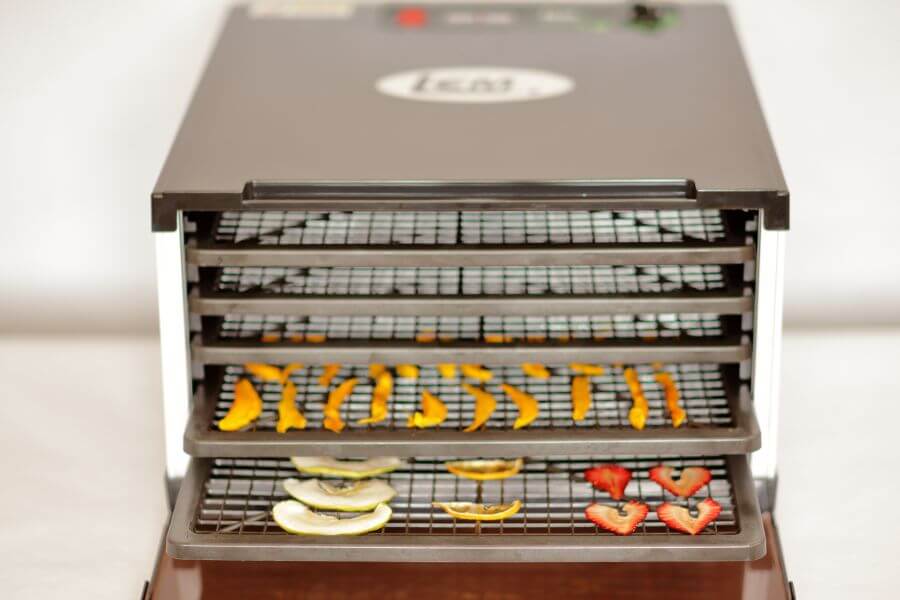
Vertical spacing between the trays really distinguished the LEM 1152 from the Excalibur 3500. In our apple-drying test, slices that started to bend or wrinkle while drying would rub against the bottom of the tray above in the Excalibur (falling off the trays when we pulled them out), and by the end of the test it was clear that there were spaces which weren’t getting as much airflow in that machine — no such problems in the LEM.

The LEM also has a removable drip-tray in the bottom of the machine, which is a feature that seems obvious and downright necessary once you’ve used it. The fold-down door was also far easier to work with than the fiddly lift-off cover on the Excalibur, and you can see through it.
The LEM isn’t a perfect machine for making jerky all by itself, but no dehydrator is. If you’re using meat that has already been heat-treated (in moist or wet conditions) to a temperature that will kill the pathogens that could make you sick, the LEM will dry jerky quickly and evenly.
While two of the other machines we tested were quieter overall than the LEM, and the machine we bought buzzed a bit from time to time, it was quiet enough to use indoors (and didn’t drive us crazy the way the Presto did.)
Key takeaways:
- The LEM Products – 1152’s horizontal airflow and sliding-tray design is far easier to work with than stacking dehydrators.
- Great drying efficiency, evenness, and thermostat accuracy.
- The 1152 wasn’t the quietest machine we tested, but performance comes from airflow.
- LEM provides amazing features for the price when compared with the competition.
- A removable drip tray! Brilliant!
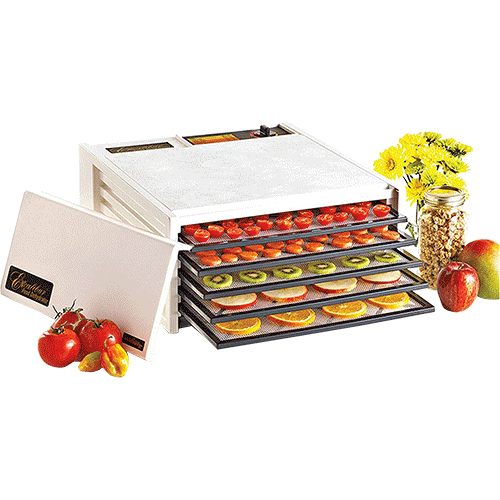
2. Runner-up: Excalibur – 3500
The Excalibur – 3500 is the machine that the enthusiasts all seem to know about and talk about. Excalibur basically invented the horizontal-flow design, and they offer a wide range of dehydrators and accessories. (the 3500 comes with a very thorough 194-page “Complete guide to food dehydration.”)

The 3500 is a good machine by any standard, and if it were priced competitively it would be an easier recommendation; Excalibur is banking on their reputation, though, and they make you pay dearly for every feature and upgrade. If you want to match functionality with LEM, the 3526CD (no longer available) with added analog-dial timer and clear door will bump the list price from an already-dear $199.95 to $269.95. Adding full digital control bumps it up to $299.95. In our testing we didn’t find these features necessary, but they’re definitely nice to have and even the cheapest model we tested included them.
Cost aside, the fact that the trays are so close together in the Excalibur 3500 is really what took our recommendation away. You could take out two trays to get more room, but the LEM just has better-chosen spacing for the drying jobs we did (though it gives the Excalibur a slight edge in the fruit-leather test.) Add in a clunky door and lack of a timer, and the Excalibur just wasn’t as nice to use.
Key takeaways:
- The Excalibur – 3500 is very popular among dehydrator-enthusiasts with a long track record of reliable consistency.
- The Excalibur performed very well in all our tests, edging out even the LEM in speed and consistency when drying fruit leather.
- The closer spacing was a downside with larger items like apple chips, which got caught up on the trays above when we pulled them out and dried less evenly than in the LEM.
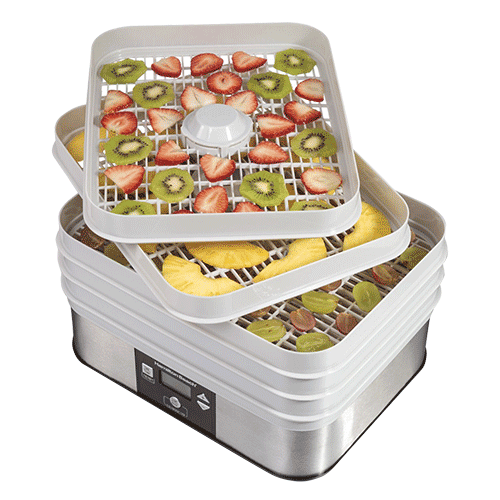
3. Budget pick: Hamilton Beach – 32100A

The Hamilton Beach – 32100A is tiny for a dehydrator, but it packs decent efficiency into its small footprint. If you want a cheap dehydrator you can store in a small cupboard and bring out every now and then to make snacks, this is it.
The Hamilton Beach dries food quickly, though not as quickly or evenly as our top pick, and you’ll probably want to move the bottom trays to the top and stir things around halfway through the cycle if you’re filling it up.

The biggest problem we had with evenness in this machine (and in the L’Equip) is that the air can’t circulate evenly to the corners of the rectangular trays. This is especially apparent on the bottom tray, where there are spots that seem not to get much hot air at all. This will be a bigger problem for some tasks than others; in follow-up batches we found that if you can leave the bottom tray empty, it helps the evenness a lot.
With full digital control, five trays, and a set of tray liners, this machine takes the cake for value any way you slice it: watts-per-dollar, capacity-per-dollar, accessories-per-dollar… if you can live with the noise and a bit of babysitting cold spots, it would be cheaper to buy two of these than an equivalent Nesco machine.
Key takeaways:
- The Hamilton Beach – 32100A is a clear value winner for small batches.
- Its compact size, front-panel controls and a see-through lid are very convenient for countertop use.
- Not as consistent when you load it up; if you’re drying larger volumes of food you’ll definitely want our top pick.
- This was the loudest machine we tested.
The other machines we tested
The Presto Dehydro 06301
We really liked the Presto Dehydro; it has a lot going for it.
From its efficiency and consistency, to its see-through lid and nesting trays (it takes up considerably less space in storage-mode than the Nesco), this is a good machine if you like the stacking design. There’s even a spool built into the base to wrap the cord around for storage.
That said, we wouldn’t choose it over the LEM for big jobs (like apple or zucchini harvest) and the more budget-friendly Hamilton Beach will do the same job if you just want to make a snack, while taking up even less of your cupboard.
The biggest downside to the Presto is really the noise it makes; it will drown out any conversation you try to have in the same part of your house.
The Nesco FD77DT
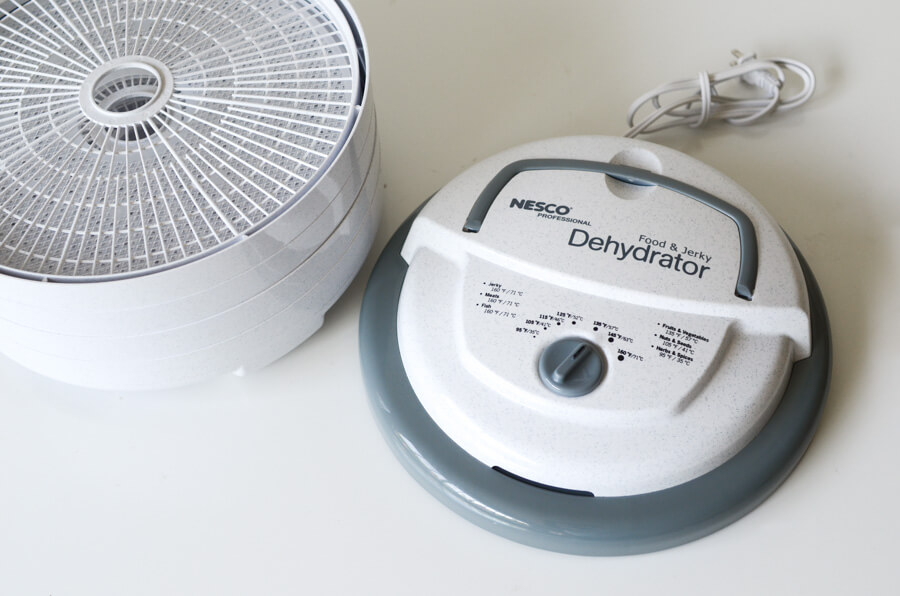
Nesco American Harvest is, like Excalibur, a well-established player in this market.
The previous version of the FD77DT, the “Snackmaster” FD75A, is still the best-selling dehydrator on Amazon. The old model had an analog thermostat with no timer, the 77DT has full digital control; fan and heat output appear to be identical. Note that the analog model includes more trays and accessories for the same price as the bare-bones digital package.
Nesco has done well making the vertical-stack design work efficiently, but not quite as well as Presto has. Presto’s trays nest for storage, but Nesco mounts the fan on top and gives you a drip tray on bottom.
If we had to choose between only the two circle-shaped stacking dehydrators, it would really come down to a choice between quiet operation and drying efficiency; the LEM has much better capacity and drying efficiency than either.
The L’Equip Filter Pro

We really wanted to like the L’Equip. It’s understated in design, but with precisely-crafted details, like a retractable cord and smooth-turning and intuitive rotary controls for the digital timer and thermostat.
It comes with more accessories than you’ll probably know what to do with (though the two small fruit leather trays are a bit underwhelming given the size of the machine.) Even the shape seems like a good compromise between the flexibility of stacking and the usability of square trays, basically giving you two decent-sized square areas on either side of the vent hole.
The best thing about this machine is also the worst: the fan is very, very quiet, but gives the worst performance for drying efficiency and consistency out of any machine we tested. As far as we can tell, the fan is just underpowered for all the drying area it has to cover. After we turned most of the machines off at the seven-hour mark in the apple test, we shuffled the trays and ran the L’Equip for another three and a half hours to get the corner slices dry — and there were still damp spots after that.
We liked the details of this machine enough to keep trying to give it a chance to shine, but however much we might like the way it looks, feels or sounds, there’s no excusing the poor performance. (Especially when it’s in the same price range as our top performer.) Based on the build quality of the Filter Pro we looked at other models from L’Equip, like the high-tech radiant-heat IR D5 model… but the price pretty much rules that one out too.
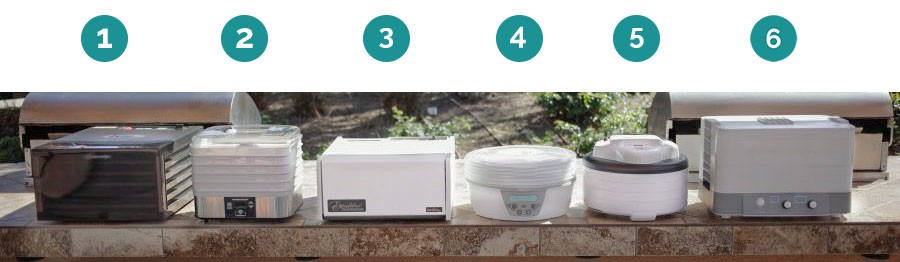
How we selected dehydrators to test
To put it mildly, our test team was unprepared for the range of opinions and demands that exists in the world of food dehydrating. Between raw diets, paleo diets, prepping, backpacking and people collecting garden herbs, there isn’t just one way to use a dehydrator.
In addition to our chats with raw food chef Jenny Ross and food safety expert Dr. Dana Hanson, we looked at an abundance of consumer content. We studied reviews on Amazon, Reddit discussions, YouTube reviews and we even looked hard at life-hack dehydrator alternatives like microwaves and box fans. Both will work, but neither will replace the convenience and performance of a good dehydrator if you want to dry food on a regular basis.
We also looked at reviews of more expensive, high-capacity dehydrators, like Jenny Ross’s favorite Tribest Sedona and the Stainless-steel-bodied dehydrators from companies like LEM, STX, and Excalibur; they look like great products and may be worth investigating if you want to use a dehydrator commercially or if you’re making literally all of your food in one, but fundamentally those more expensive machines work the same way as the less expensive models we tested.
Warranty information and reliability reports were considered, and we chose manufacturers that had good reputations, but at the end of the day quality control is never a sure thing: every manufacturer had some reviews from customers who saw parts or assembly issues that gave them pause.
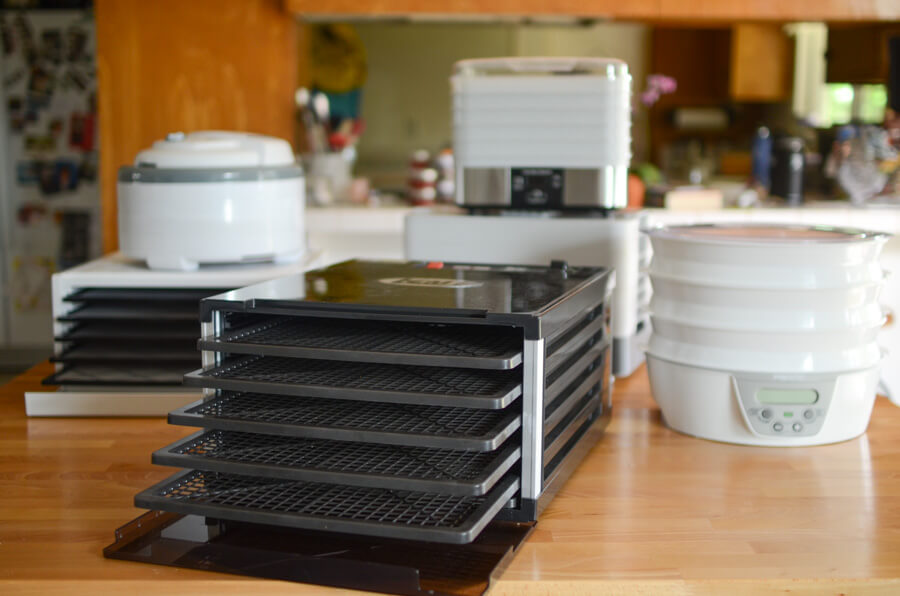
How we tested
We checked the weight of the top tray, bottom tray and the total net load that went into each machine before we started. We checked weights and temperatures for each machine after one, three, five and seven hours of drying. We checked both the air around the food and the internal temperatures of the items with a beaded-wire K-type probe. Once the food has dried it’s very difficult to get a probe inside, and the fruit leather is really too thin to begin with, so in those cases we switched to a surface reading with an infrared thermometer.

The results are as follows:
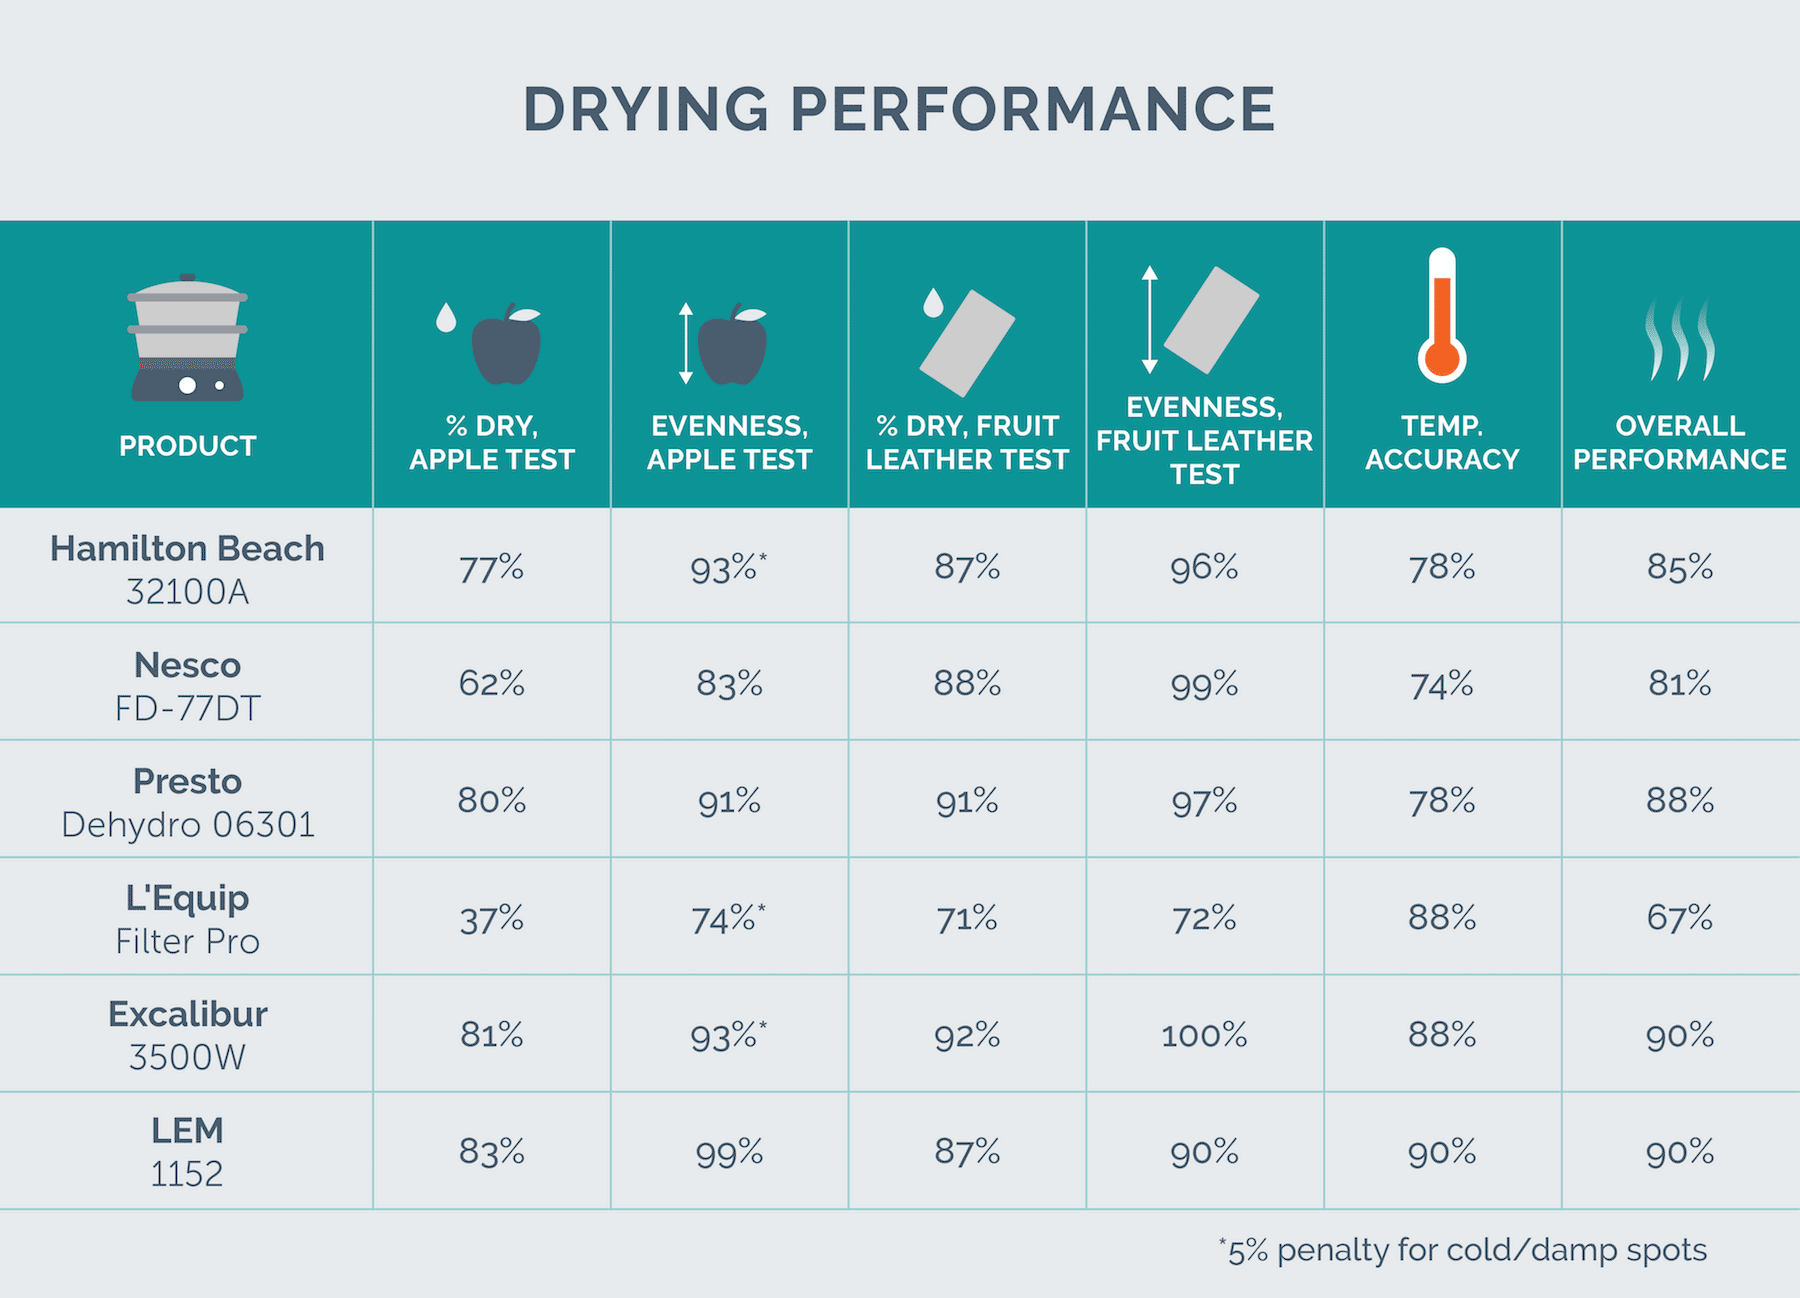
Percentage dry
This is the percentage of the water-mass removed from the total mass of the food we put in the machine after seven hours. (The National Center for Home Preservation says to aim for an 80% reduction for fruit, and seven hours is within the expected drying time — which will vary depending on ambient humidity.)
Evenness
This is a measure of how consistently the fruit dried on the trays in a machine (for stacking machines, this is the weight difference between top/bottom; for the horizontal flow machines we chose the second and fifth trays because the middle three trays are closest to the heating element).
Note that in the apple test there were a few machines that had between four and six slices that were notably wetter than the rest on the same tray after the seven hour mark (wet enough that we separated them from the rest of the batch to prevent spoilage when we bagged everything). We’ve deducted 5% from the consistency score for those machines.
Temperature Accuracy
This is an indicator of how close the machine stayed, on average, to the temperature we set on the thermostat. Readings are averaged between two trays, which were checked with a dry-bulb test (bare probe in the airstream) for three minutes each time we checked the machines. Most of the machines cycled up and down over the course of a few minutes.
We tried three different dehydrator recipes for our tests:
Fruit leather

For each machine we took a 1lb basket of strawberries, cleaned them and removed any brown spots, then puréed with a few apple slices and a lemon wedge thrown in. The purée was poured into greased trays if included with the dehydrator, or onto greased parchment paper if they weren’t. (Rolling the leather with parchment paper is the best way to store fruit leather anyway.)
For the fruit leather test, we divided the purée for the LEM and Excalibur machines into top/middle/bottom; there was definitely quicker drying near the heating element in the back-middle of the machine, but by the end of drying the top and bottom, the two were basically the same and consistency was very good overall in the horizontal-flow machines. For the other tests, we checked top and bottom and found that the consistency was quite good in all of the machines except the L’Equip.
In the L’Equip FIlter Pro the bottom tray was very brittle even before the top tray was finished drying. It took some soaking to get most of the baked-on fruit off that tray, even though we greased it before we poured the purée in. The Filter Pro can put out enough heat to dry fruit leather, but the fan doesn’t seem big enough to circulate that heat evenly.
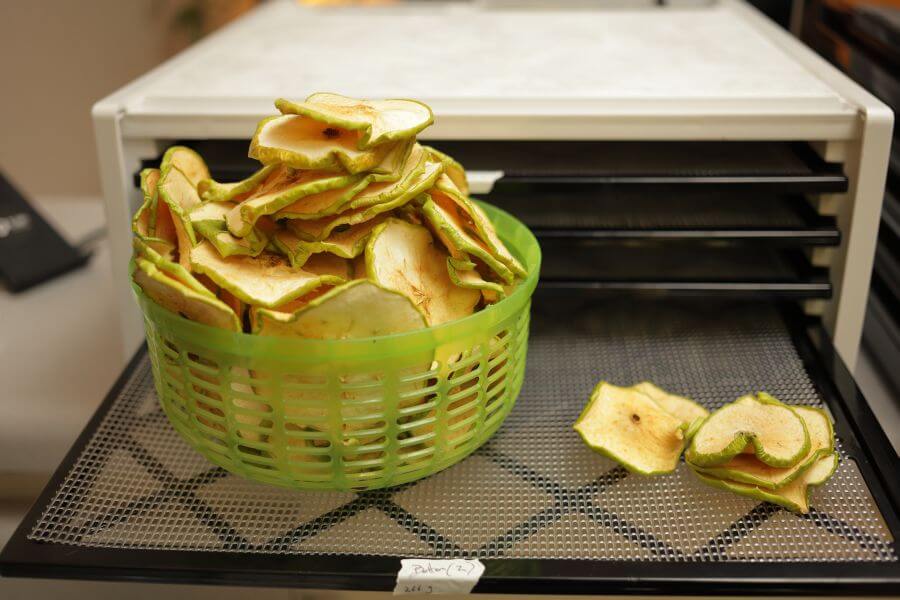
Apple slices

We used almost 20 pounds of fairly large granny smith apples, cleaned and sliced about 1/4” thick with an electric slicer to maintain uniformity. The slices went straight from the slicer to the dehydrator rack. After drying for seven hours at 140 °F, the result was (in most cases) tart and chewy with just the right amount of sweetness!
Many recipes suggest adding cinnamon, honey, or pre-treating in ascorbic acid (vitamin C) to help prevent browning; our slices dried quickly enough that we didn’t see much browning and we liked the ‘raw’ taste. Apples are easy to dry and provide a broad canvas with which to experiment!
Jerky
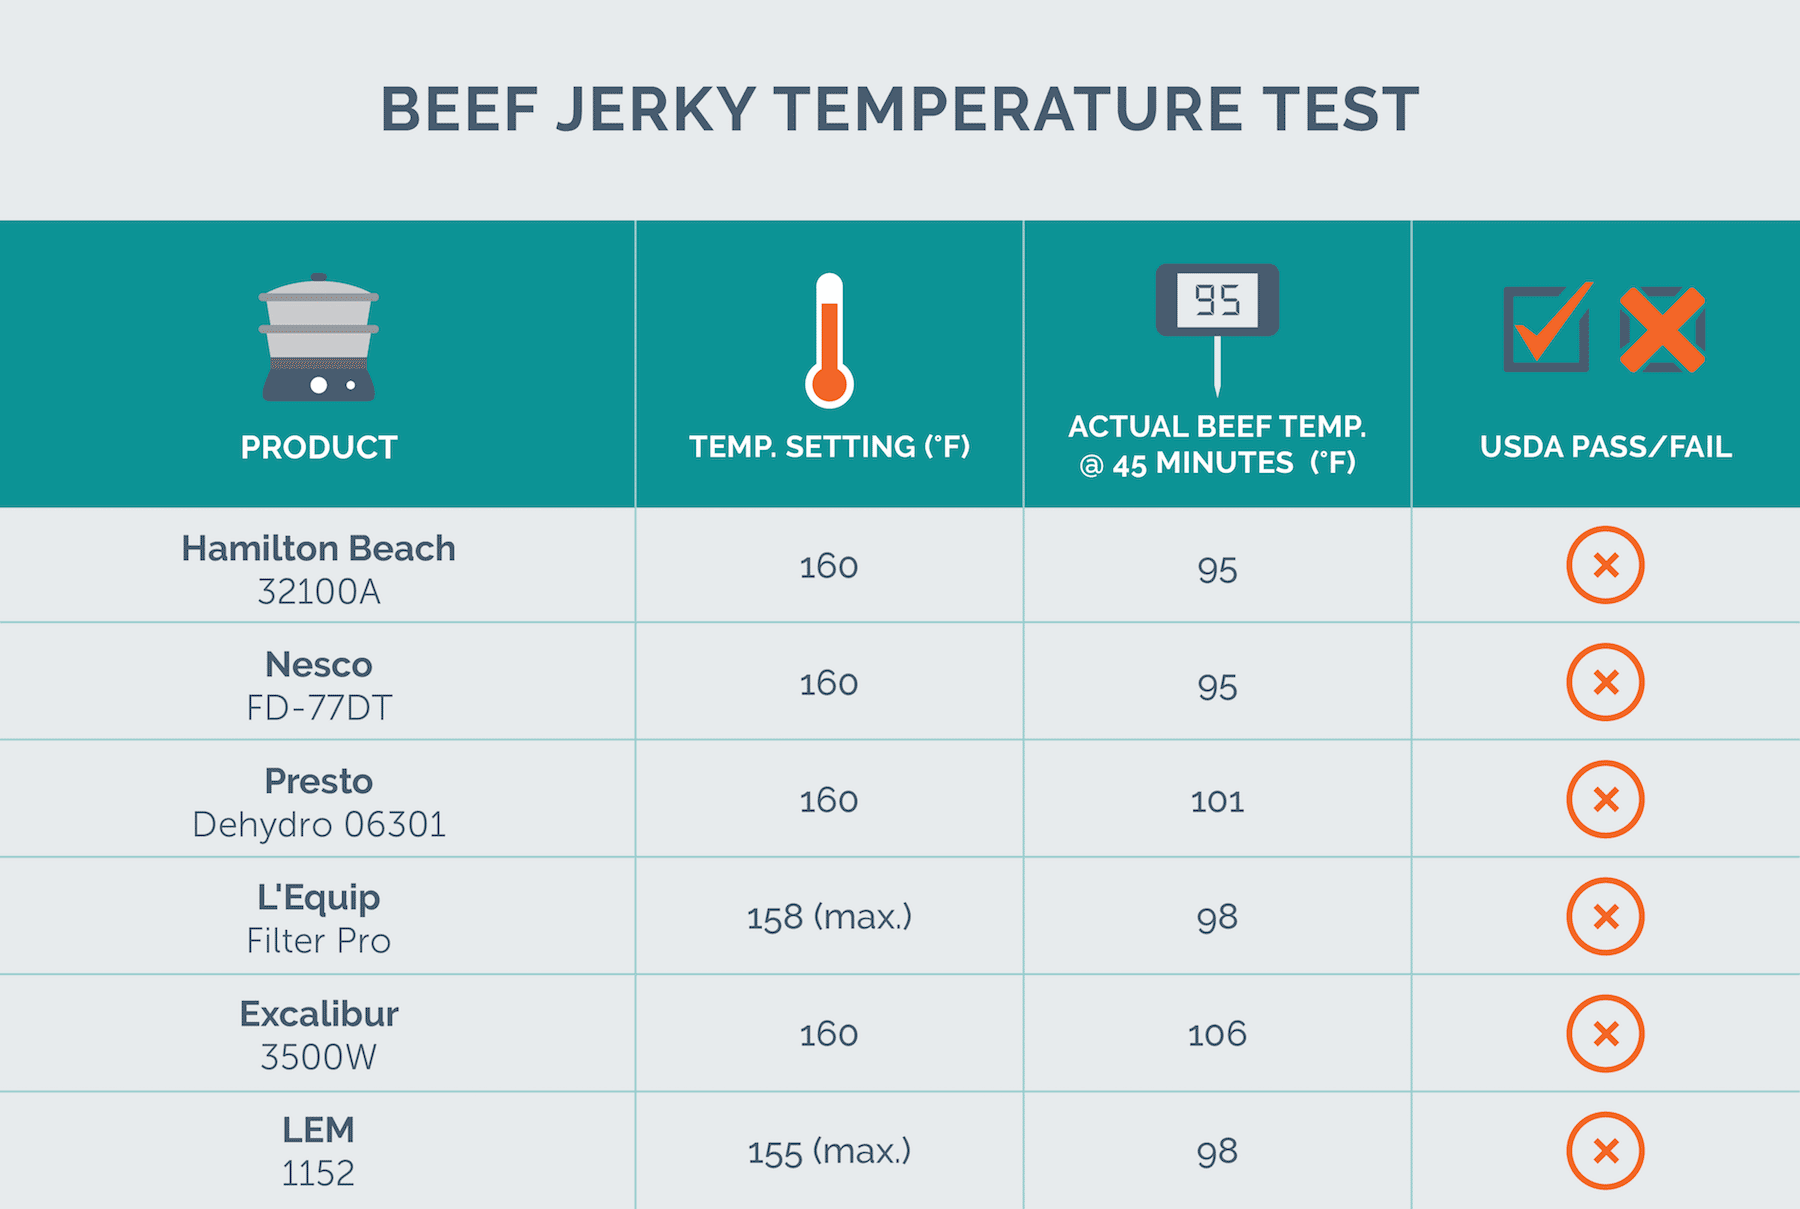
We used the classic Worcestershire-and-soy-sauce jerky marinade overnight on some thinly-sliced top round beef. Before we dried it, we followed US Federal food-safety guidelines for jerky-making by heating the meat (we put the meat and marinade directly into a stockpot) to an internal temperature of 160 °F prior to drying. This method will reliably kill more than 99.9999% of any bacteria present.
A note on jerky and food safety
Although USDA food safety guidelines are usually mentioned in dehydrator instruction manuals, many recipes you’ll find among jerky enthusiasts skip the pre-cook, since cooked meat can make a jerky that’s more brittle or crumbly.
Jerky and other dried meat products have been around for nearly as long as humans have, so traditionalists might seem reasonable in insisting that un-cooked jerky won’t necessarily make you sick. There are cases of salmonella and e.coli contamination that have shown up even in commercially produced jerky when USDA guidelines aren’t rigorously followed, though: food safety policy is about evaluating risk.
To get a definitive answer about temperatures needed for reasonable safety in jerky-making, we reached out to Dr. Dana Hanson of North Carolina State University’s Department of Food, Bioprocessing and Nutrition Sciences.
Dr. Hanson explained that simply salting the meat is not enough to eliminate pathogens that could be present in any meat. “The pathogens that we worry about [salmonella and e. coli]… There’s just not a lot of definitive research out there that shows ‘if we just salt it and dry it’s going to achieve [enough] reductions.’ So that’s why we cook jerky in the US.”

“I totally understand,” he said, “from a culinary standpoint… boiling is probably not what you want to do. I appreciate good jerky, but [pre-cooking jerky] can provide the safest system and still have pretty acceptable quality.”
We talked to Dr. Hanson about the temperature readings we got, with internal temperatures of 90-110 °F for the first hour of drying.
“If there’s danger in home jerky processing, that’s where it exists: those temperatures are near perfect incubation temperatures for some of the pathogens we’re talking about.“
And once the meat has dried, will a high-temperature dehydrator solve our problems then? Not really. Some moisture is required to kill pathogens like salmonella. As Dr. Hanson pointed out, “There are some species that actually are more tolerant to heat at low humidities.”
So while any of these machines is able to effectively dry out meat that has been made safe by pre-cooking, we don’t recommend any of them as a risk-free means of turning raw meat directly into jerky — pretty much any dehydrator will fail that test.
Noise level

We set up in our test kitchen late at night and measured both the sound level and the pitch of the fan noise produced by each dehydrator. (We’ve included samples from the kitchen’s microwave and fridge as well, for comparison; they were unplugged during the rest of the test.)
We measured noise level using the same sound-measuring methodology as workplace or environmental noise exposure standards. Sound level measurements are integrated over time with a formula that accounts for the non-linear way we respond to changing sound level, and with a “weighting” that simulates the way our ears respond more readily to high-frequency sound. (The result is a “Level Equivalent, A-weighted,” or LeqA). We used a 30-second measurement time since the noise from these machines is more steady than, say, traffic noise that’s measured over hours.
Our test equipment included a calibrated measurement microphone patched through the REW audio measurement suite on a PC. Frequency-response calibration of the mic was provided by Dayton Audio from the factory, and we verified the SPL calibration of the system against a Galaxy Audio CM-130.

We mounted the microphone on a stand at ear level in the middle of the test kitchen (about four feet from the countertop test position). Levels will be higher if you want to stand right beside the machine, of course, but these results are directly comparable with each other.
While on the whole a lower dB reading is desirable, low-frequency noise is also less annoying than high-frequency noise; frequencies above 500Hz (see the Presto and Hamilton Beach results) are significant because they overlaps with important parts of human speech, and that makes it hard to have a conversation in the same room.
The L’Equip is a clear winner here (almost as quiet as the fridge), but when we compare its performance in the other categories… it’s pretty obvious that the machine is quiet because the fan is not moving much air.
Note that while it put out less noise energy overall than the Excalibur, the LEM sometimes made a resonant noise that might be more annoying to some. (Probably from two pieces of sheet inside vibrating against each other.) We waited a while to be sure it was making this noise while we recorded the audio test. This may be a flaw in the construction of the machine we received, or it may be consistent throughout the line; even with some buzzing the LEM is still far quieter than the Hamilton Beach or the Presto.
Why use a dehydrator?
Anyone with a productive zucchini plant or apple tree probably already knows: when gardening, a preservation plan is the difference between enjoying the fruit of your labor and tossing a good portion of it into the compost pile.
Preservation isn’t the only reason to use a dehydrator. Fruit that’s sliced or puréed and then dried makes for amazing snacks, like banana chips or strawberry leather. Almost all of the flavor of ripe fruit remains, but concentrated and without any sticky mess. (Backpackers love dehydrators, some even dry out cooked food — like chili or soup — so it’ll be easier to prepare on the trail.)
It’s not just about snacks, either. Those who eschew cooking to preserve the enzymes in raw or ‘living’ food can accomplish amazing things with a dehydrator. Believe it or not, our research turned up raw-food recipes for cracker-like dried breads, desserts, wraps, pizza… you can even make raw-vegan pancakes!
Dehydrators are machines dedicated to speeding up the drying process with forced air and electric heating elements. Handy trays, temperature control and built-in timers also help make the work easier.
Most literature on home preservation of food recommends that you try to eat all of your home-dried food within a year (spoilage can still happen with unexpected moisture and heat over time), but there’s really no limit on how long it could last in the right storage conditions. (Fruit cake has been known to keep for centuries.)
Important features to consider
Air flow direction
The biggest difference in dehydrator designs is the way air passes among the trays: horizontally or vertically. Each design will successfully dry food, though consistency and ease of use may vary from one machine to another.
Horizontal flow (like our top pick) means a big box and a big fan blowing across trays that will slide in and out of the box (very much like a small convection oven, but with way more airflow and less heat). A horizontal airflow design means that there is fresh air coming off the fan hitting each tray directly. (You can also take some trays out to get more space for large items.)
Vertical flow (like our budget pick) means a fan at the bottom (or top, in the case of Nesco’s “Converge-a-Flow” system) with trays in a stack. Stacking designs capitalize on the way hot air naturally rises, so (theoretically) the fan doesn’t need to work as hard to do the same job. You can also buy extra trays and simply add them to the stack to increase the machine’s capacity.
There are downsides to each design. The horizontal-flow systems take up more counter space, while the stacking designs always have a vent hole in the middle of the tray that does require creativity when drying some items — sheets of cracker or fruit leather, for example, will have a circle cut out in the middle.
Capacity

How much you can dry in one go is the biggest variable when selecting a specific dehydrator model.
You can technically get more capacity for less money with a vertical stack, since additional trays cost less than an additional machine. Each of those trays is still going to be relatively small compared to the trays in a horizontal-flow machine, though, and any concerns about uneven drying will only get worse with more trays in a vertical stack.
If you need even more capacity, Excalibur and LEM sell machines with nine or ten trays compared to the five-tray designs we tested — of course, that makes the machines taller and more expensive. They come with larger fans and heating elements, so you’ll get similar drying performance to the five-tray models, unlike the just-add-trays philosophy of stacking machines.
Controls
There are a few control features that can add convenience to dehydrator operation. A thermostat is essential if you want any control at all over drying speed on different types and sizes of food items, while a timer doesn’t really change the way the machine works (it just means the machine won’t run forever if you forget about it.)
All the models we tested aside from one have a timer, and they all had some kind of thermostat (some digital, some analog.) Some can be purchased for less money if you don’t want a timer, or at rock-bottom prices if you only want one temperature (typically those are stuck wide-open at 160 °F, which is too hot for herbs or delicate veggies.)
Accessories
The machines we tested came with a wide gamut of accessory types, but the comparison isn’t always apples-to-apples.
The Excalibur and L’Equip dehydrators come with a removable mesh liner for each tray, which seems like a big bonus. The trays on most machines don’t actually need a mesh liner unless you’re drying seeds or small berries. The spacing of the grid is close enough that anything bigger than a grape won’t fall through.
In fact, in the tests we ran, the Excalibur was the only machine with trays that really needed a mesh “easy-clean” liner to keep food from falling through. If you’re drying fruit that’s super-sticky (candied fruit, for example) the liners might be easy to scrub, but you’ll need to wash off the trays themselves one way or the other.
Fruit leather trays from the manufacturer are a must-have if you want to make roll-ups in a stacking machine with a hole in the middle of each tray, but with broad square trays in the horizontal-flow machines, a sheet of greased parchment paper will do an even better job than purpose-built trays (since most people will use parchment paper to roll up fruit leather for storage anyhow.)
A note for raw food drying
Raw or “living” food diets typically call for preparation without heating past 118 °F, to preserve enzymes and other beneficial organisms or nutrients. For some guidance regarding the specialized needs of a raw-food diet, we reached out to a local raw-food restaurateur and cookbook author, Jenny Ross.
Jenny notes that while an accurate thermostat system is a crucial part of a dehydrator, drying temperature is a bit more complicated than the time/temperature you deal with when baking or roasting:
“What you have to understand is that the dehydrator is simply moving warm air over your food item. You are actually dealing with three temperatures: the temperature of that warm air [coming off the heating element], the internal temperature of the food product itself, and the ambient temperature of the air which is affected by the moisture release of the food product you are drying.”
All this means that drying will happen differently depending on the thickness of the food, texture of the food, and how much water it starts with.
“Wraps, for example, are very finicky. If your goal is a culinary masterpiece you want a dehydrator that holds its temperature accurately overall. Dehydrators with a solid construction are the number one thing I look for, number two is the drying technology: can it hold a solid temperature for the whole dehydrating process?”
The bottom line
Dehydrating is a great way to store or prepare food, and these machines all give you complete control over the process: nothing will go into your granola or fruit leather or jerky that you didn’t add yourself, and you can decide just how much heat you want to use to speed up the drying process.
Any of these machines will get food dry eventually and with a bit of care, but the LEM Products 1152 does it quicker and more efficiently, and you can load it up without worrying about shuffling trays. It’s a much better value than any other machine with the same features, too.
If you don’t have nine pounds of zucchini and 20 pounds of apples to store every fall, you may be happier with the size and value of the Hamilton Beach 32100A, which is loud and not quite as consistent, but does a good job with small batches.

More Reviews


Char-Broil - Performance
The 9 Best Microwave Bacon Cookers
Presto - Power Crisp
Instant Pot - DUO60
Cuisinart - MSC-600
Mueller - MFFVS-01
Masterbuilt - 20071117
The 8 Best Electric Egg Cookers
Elite Gourmet - EGC-007B
The Best Protein Powders for Women
Muscle Feast - Whey Isolate
Thermos - 2700TRI6